
Well crafters and decorators, we are one week away from Christmas Eve! I can't believe it. I have a mountain of presents to wrap. Please tell me I'm not alone!
But before I get to present wrapping, I thought I would take some time to share my breakfast area. A few months back I painted over the chalkboard calendar wall that I blogged about...for a few reasons. 1) I didn't take into account the texture of my wall. It drove me crazy! You cannot write on it. Or should I say, an OCD person cannot write on it. 2) I have yet to find a chalkboard pen that doesn't take FOREVER to remove. 3) We just didn't use it. So, bye Felicia to the calendar and hello to the BLACK ACCENT WALL, which just happens to be chalkboard paint.
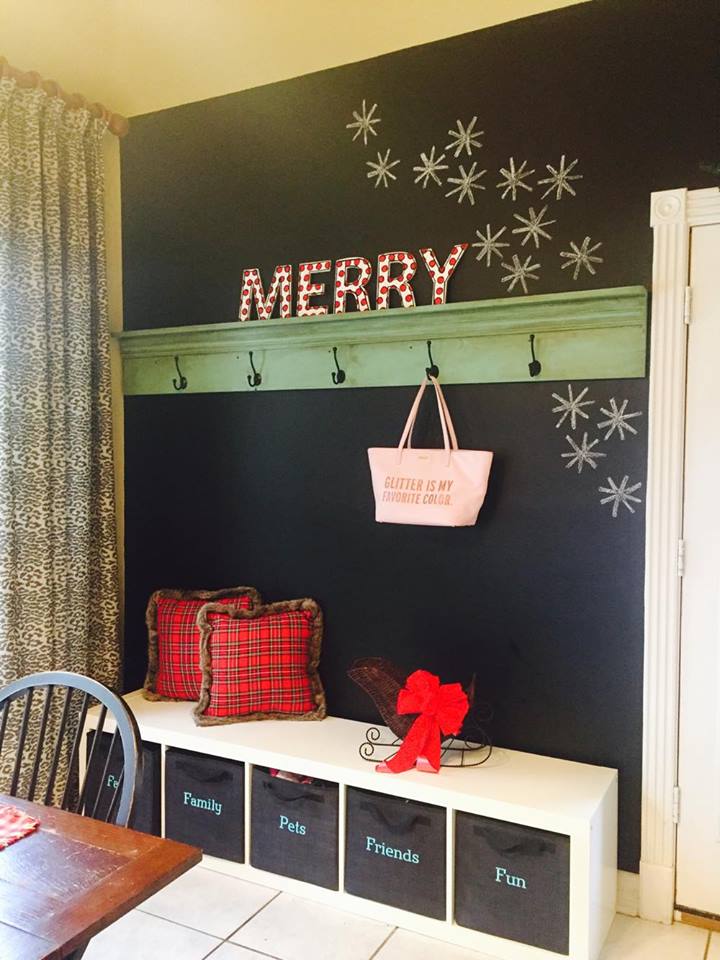
Can we talk about the shelf my hubby made me? I LOVE IT. I used Dixie Belle Chalk Paint in Mint Julep followed by Annie Sloan clear and dark waxes. Are you supposed to mix the two brands? I don't know, but it's what I had laying around the house, and it turned out just fine. That Mint Julep color reminds me of Jadite, which I have a small collection of.
Here's the paint I used for the wall. I think I got it at Lowe's.

Now I must admit that even I, who tells y'all that it's only paint, took a week or so to be certain that painting the wall black was something I could live with. But now I really like it!
Let's talk about the snow flurries, asterisks, doodles...whatever you want to call them. Last week I was skimming through Instagram and came across a wall full of these little awesomes on Hotpinkstyle55's IG page. I instantly loved it. You can read her blog post HERE. Perhaps I was also drawn to it because the design has a retro feel. While I don't decorate in mid-century modern, I have an appreciation for it and anything that reminds me of "Mad Men". Sigh, I miss that show....and Don... Anyway, I followed the links to the free downloadable PDF with the design. I saved the PDF, imported it into my Silhouette Design Studio Software, traced it and made a stencil.

What material do I use to make my stencils? I used this Grafix Clear Craft Plastic. Check out this screenshot for the special cut settings I set up for this material. I currently have the first addition of the Silhouette Cameo but have asked Santa for a Silhouette 3. Fingers crossed. I've been mostly good this year.

PLEASE NOTE THAT YOU HAVE TO CUT 2 SETS OF DOUBLE CUTS...WHICH MEANS YOU WILL CUT THIS A TOTAL OF FOUR TIMES.
Do you want the cut file I created from Jill's PDF? Good, because I thought I would share it. Here is the SILHOUETTE STUDIO FILE. Here is the SVG FILE.
After my stencil was cut out, I just placed it randomly on the wall and colored it in crudely with a regular piece of chalk. I love the whimsical, wintery feeling I get looking at them on the black wall! The texture of my wall works fine for something simple and seasonal like this, and since it's plain old chalk it should wash off easily.
I made the "MERRY" by using acrylic paint to paint Paper Mache Letters from Hobby Lobby white, then painted red polka dots, outlined it all with a thick, black Sharpie and finally sealed it with a coat of polyurethane. Easy.

Now make your own stencils and decorate!!!!

Angela Davis of Prettify Your Life is a participant in the Amazon Services LLC Associates Program, an affiliate advertising program designed to provide a means for sites to earn advertising fees by advertising and linking to amazon.com
No comments:
Post a Comment
Post your comment here!